admin
Ingredients for Blueberry Lemon Glaze Biscuits
Gathering the right ingredients is the first step to creating these scrumptious Blueberry Lemon Glaze Biscuits. Here’s what you’ll need:
- All-purpose flour: This is the backbone of your biscuits, providing structure and fluffiness.
- Baking powder: A leavening agent that helps your biscuits rise and become light.
- Baking soda: Works alongside baking powder for that perfect lift.
- Salt: Just a pinch enhances the flavors and balances the sweetness.
- Granulated sugar: Adds sweetness to the dough, making every bite delightful.
- Unsalted butter: Cold and cubed, it creates those flaky layers we all love.
- Buttermilk: This adds moisture and a slight tang, making the biscuits tender.
- Vanilla extract: A splash of vanilla brings warmth and depth to the flavor.
- Fresh blueberries: The star of the show! They burst with juicy flavor in every bite.
- Powdered sugar: Essential for the glaze, giving it that sweet, smooth finish.
- Fresh lemon juice: Adds a zesty kick to the glaze, brightening up the flavors.
- Lemon zest: A sprinkle of zest enhances the lemony aroma and taste.
- Milk: Just in case your glaze needs a little thinning for the perfect drizzle.
For those who might not have all the ingredients on hand, feel free to substitute frozen blueberries if fresh ones are unavailable. And remember, the exact quantities for each ingredient are listed at the bottom of the article for easy printing!
How to Make Blueberry Lemon Glaze Biscuits
Now that you have all your ingredients ready, let’s dive into the fun part: making these delightful Blueberry Lemon Glaze Biscuits! Follow these simple steps, and you’ll have a batch of warm, fluffy biscuits in no time.
Step 1: Preheat the Oven
First things first, preheat your oven to 400°F (200°C). This sets the stage for perfectly baked biscuits. While the oven warms up, you can prepare your baking dish. Grease or line a cast-iron skillet or baking dish with parchment paper. This will help your biscuits come out easily!
Step 2: Mix Dry Ingredients
In a large bowl, combine the all-purpose flour, baking powder, baking soda, salt, and granulated sugar. This mixture is the foundation of your biscuits. Whisk them together until they’re well blended. It’s like creating a cozy little home for all the flavors!
Step 3: Cut in the Butter
Next, take your cold, cubed butter and add it to the dry ingredients. Using a pastry cutter, mix the butter into the flour mixture until it resembles coarse crumbs. This step is crucial for achieving those flaky layers we all love in biscuits. Don’t rush it; take your time!
Step 4: Add Wet Ingredients
Now, it’s time for the magic! Stir in the buttermilk and vanilla extract until the dough just comes together. Be gentle here; overmixing can lead to tough biscuits. You want a soft, slightly sticky dough that’s ready to be transformed!
Step 5: Fold in Blueberries
Gently fold in the fresh blueberries. This is where the fun begins! Each bite will burst with juicy flavor. Just be careful not to crush the berries; we want them whole for that delightful pop!
Step 6: Shape the Dough
Turn the dough onto a floured surface and gently pat it into a rectangle about 1 inch thick. Use a sharp knife or biscuit cutter to cut the dough into squares or rounds. Place the biscuits in your prepared skillet, close together but not overlapping. They’ll rise beautifully!
Step 7: Bake the Biscuits
Brush the tops of the biscuits with a little buttermilk for that golden finish. Now, pop them in the oven and bake for 18-22 minutes. The aroma will fill your kitchen, and you’ll be counting down the minutes in anticipation!
Step 8: Prepare the Lemon Glaze
While the biscuits are baking, whisk together the powdered sugar, fresh lemon juice, and lemon zest in a small bowl. This tangy glaze is what elevates your biscuits to the next level. If it’s too thick, add a splash of milk until you reach the perfect drizzle consistency.
Step 9: Drizzle and Serve
Once the biscuits are golden brown and fluffy, take them out of the oven. Drizzle the lemon glaze over the warm biscuits and serve immediately. Enjoy the delightful combination of flavors that will surely brighten your day!
Ingredients for Oreo Cream Chocolate Roll-Ups
Let’s gather our ingredients for these delightful Oreo Cream Chocolate Roll-Ups. Each component plays a vital role in creating that perfect balance of flavors and textures. Here’s what you’ll need:
- All-purpose flour: The base for our crepes, giving them structure and a soft texture.
- Unsweetened cocoa powder: This adds a rich chocolate flavor to the crepes, making them extra indulgent.
- Sugar: A touch of sweetness to balance the cocoa and enhance the overall flavor.
- Salt: Just a pinch to elevate the sweetness and bring out the flavors.
- Large eggs: They help bind the ingredients together and create a fluffy texture.
- Milk: Adds moisture to the batter, making it smooth and easy to pour.
- Melted butter: This enriches the crepes and prevents them from sticking to the pan.
- Vanilla extract: A splash of vanilla adds warmth and depth to the flavor profile.
- Heavy cream: The star of our filling, it whips up beautifully for a light and airy texture.
- Powdered sugar: Sweetens the cream filling and helps it hold its shape.
- Crushed Oreo cookies: These add that signature Oreo flavor and a delightful crunch to the filling.
- White chocolate drizzle: A sweet finishing touch that adds elegance and extra sweetness.
- Extra whipped cream: For topping, because who doesn’t love more cream?
- Crushed Oreos: For sprinkling on top, adding a fun and tasty garnish.
How to Make Oreo Cream Chocolate Roll-Ups
Prepare the Crepe Batter
Let’s kick things off by making the crepe batter for our Oreo Cream Chocolate Roll-Ups. In a large bowl, whisk together the all-purpose flour, cocoa powder, sugar, and a pinch of salt. This dry mix is the foundation of our crepes. In another bowl, combine the eggs, milk, melted butter, and vanilla extract. Whisk until well blended. Gradually pour the wet ingredients into the dry mix, stirring until the batter is smooth and lump-free. Let it rest for about 15 minutes. This step is crucial for achieving that perfect crepe texture!
Cook the Chocolate Crepes
Now, it’s time to cook those delicious chocolate crepes! Heat a non-stick skillet over medium heat and lightly grease it with butter. Pour about ¼ cup of the batter into the skillet, swirling it around to coat the bottom evenly. Cook for 1–2 minutes until the edges start to lift and the surface looks set. Carefully flip the crepe using a spatula and cook for another minute. Once done, stack the cooked crepes on a plate and cover them to keep warm. Repeat until all the batter is used. Trust me, the aroma will be heavenly!
Make the Oreo Cream Filling
Next up is the star of the show: the Oreo cream filling! In a chilled bowl, beat the heavy cream with powdered sugar and vanilla extract until soft peaks form. This means the cream should hold its shape but still be fluffy. Gently fold in the crushed Oreo cookies, ensuring they’re evenly distributed. This adds that delightful crunch and signature Oreo flavor. The filling should be light and airy, perfect for our roll-ups. Get ready for a creamy explosion of flavor!
Assemble the Roll-Ups
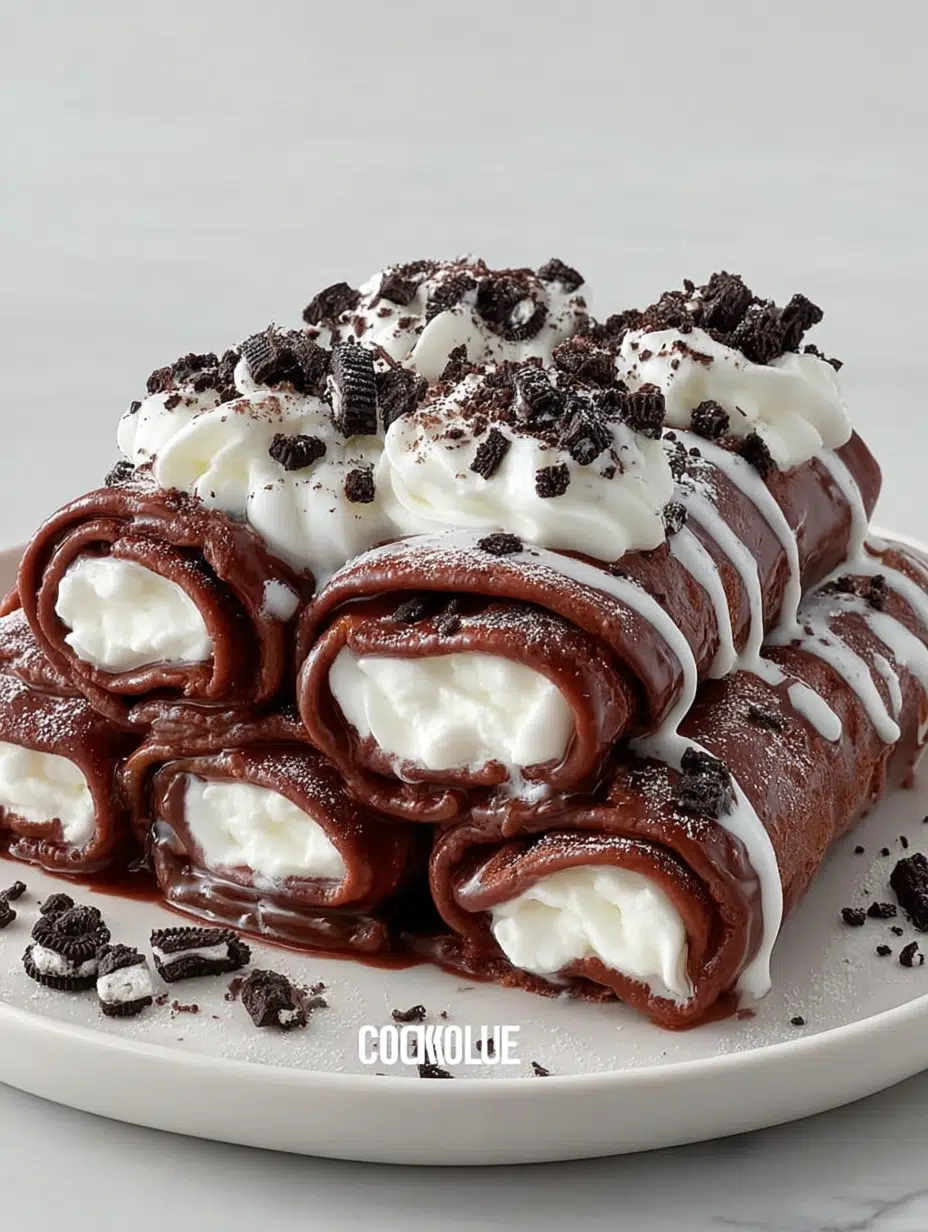
Now comes the fun part: assembling the Oreo Cream Chocolate Roll-Ups! Take a chocolate crepe and spread a generous spoonful of the Oreo cream filling onto it. Roll it up tightly, making sure the filling stays inside. Place the roll seam-side down on a serving plate. Drizzle with melted white chocolate for that extra touch of sweetness. Top with a dollop of whipped cream and sprinkle more crushed Oreos on top. These roll-ups are not just a treat; they’re a work of art!
Ingredients for Cheesy Stuffed Birria Pizza
Gathering the right ingredients is the first step to creating your Cheesy Stuffed Birria Pizza masterpiece. Here’s what you’ll need:
- All-purpose flour: This is the backbone of your pizza dough, giving it that perfect chewy texture.
- Instant yeast: This little packet helps your dough rise quickly, making the process a breeze.
- Warm water: Activates the yeast and helps bring the dough together. Make sure it’s not too hot!
- Olive oil: Adds richness to the dough and helps create a crispy crust.
- Sugar: Just a pinch to feed the yeast and enhance the dough’s flavor.
- Salt: Essential for seasoning the dough and balancing flavors.
- Cooked shredded birria beef: The star of the show! Use homemade or leftover birria for a rich, savory filling.
- Shredded mozzarella cheese: This melty goodness is what makes every bite heavenly.
- Oaxaca cheese (optional): For that authentic stretchy cheese experience, this is a must-try!
- Pizza sauce or birria consommé: Spread this on top for an extra layer of flavor that ties everything together.
- Fresh cilantro or parsley (optional): A sprinkle on top adds a fresh touch and a pop of color.
How to Make Cheesy Stuffed Birria Pizza
Now that you have all your ingredients ready, let’s dive into the fun part: making your Cheesy Stuffed Birria Pizza! Follow these simple steps, and you’ll be on your way to pizza perfection.
Step 1: Prepare the Dough
Start by mixing warm water, sugar, and instant yeast in a large bowl. Let it sit for about five minutes until it becomes foamy. This is the yeast waking up and getting ready to work its magic!
Next, add the all-purpose flour, salt, and olive oil to the yeast mixture. Mix everything together until it forms a rough dough. Then, knead the dough on a floured surface for about eight minutes. You want it to be smooth and elastic, like a soft pillow ready for a cozy nap.
Step 2: Let the Dough Rise
Once your dough is kneaded, place it in a greased bowl. Cover it with a clean kitchen towel and let it rise in a warm spot for about an hour. You’ll know it’s ready when it has doubled in size. This is the dough’s time to shine!
Step 3: Preheat the Oven
While the dough is rising, preheat your oven to 425°F (220°C). This ensures that your Cheesy Stuffed Birria Pizza will bake evenly and come out perfectly golden brown.
Step 4: Assemble the Pizza
After the dough has risen, divide it into two portions. One should be slightly larger for the base, while the other will be the top. Roll out the larger portion and place it in a greased round pizza pan, letting it hang slightly over the edges.
Now comes the fun part! Spread the cooked shredded birria beef evenly over the dough, followed by a generous layer of shredded mozzarella cheese. If you’re feeling adventurous, add some Oaxaca cheese for that extra stretch!
Roll out the smaller dough portion and place it on top of the filling. Make sure to seal the edges well, so all that cheesy goodness stays inside. Spread your pizza sauce or birria consommé over the top layer, and sprinkle more mozzarella cheese on top. Trust me, you can never have too much cheese!
Step 5: Bake the Pizza
Now it’s time to bake! Place your assembled pizza in the preheated oven and let it bake for 20 to 25 minutes. Keep an eye on it; you want it to be golden brown and bubbly. The aroma will fill your kitchen, making it hard to resist!
Step 6: Cool and Serve
Once your Cheesy Stuffed Birria Pizza is out of the oven, let it cool for about five minutes. This helps the cheese set a bit, making it easier to slice. Garnish with fresh cilantro or parsley if you like, and then slice it up. Get ready for a flavor explosion!
Ingredients for Cheesy Garlic Butter Rollups
Let’s dive into the deliciousness that makes up these Cheesy Garlic Butter Rollups! Here’s what you’ll need:
- Refrigerated crescent roll dough (or pizza dough): This flaky dough is the perfect base, giving you that buttery texture. You can find it in the refrigerated section of your grocery store.
- Cheese sticks (mozzarella or a mix of mozzarella & cheddar): The star of the show! Gooey, melted cheese is what makes these rollups so irresistible. Feel free to mix and match your favorite cheeses!
- Unsalted butter: This adds richness and flavor. I prefer unsalted so I can control the saltiness of the dish.
- Garlic: Freshly minced garlic brings a punch of flavor. It’s aromatic and adds that classic garlic taste we all love.
- Fresh parsley: Chopped parsley adds a pop of color and freshness. If you don’t have fresh, dried parsley works too!
- Grated Parmesan cheese: This adds a nutty, salty flavor that complements the other cheeses beautifully.
- Italian seasoning: A blend of herbs that enhances the overall flavor. It’s like a little Italian vacation in your rollups!
- Marinara sauce: Perfect for dipping! This classic sauce pairs wonderfully with cheesy snacks.
- Ranch or garlic sauce (optional): For those who love a little extra flavor, these sauces are great alternatives for dipping.
How to Make Cheesy Garlic Butter Rollups
Now that we have our ingredients ready, let’s dive into the fun part—making these Cheesy Garlic Butter Rollups! Follow these simple steps, and you’ll have a delicious snack in no time.
Step 1: Preheat the Oven
First things first, preheat your oven to 375°F (190°C). This ensures that your rollups bake evenly and come out perfectly golden. While the oven warms up, you can get everything else ready!
Step 2: Prepare the Dough
Next, roll out your crescent roll dough or pizza dough on a clean surface. Cut it into 8–10 rectangles. If you’re using crescent dough, make sure to pinch the seams together to avoid any cheese leaks later on. Trust me, you want all that gooey goodness inside!
Step 3: Add the Cheese
Now, take your cheese sticks and place one at the end of each dough rectangle. You can also use cheese slices if you prefer. Just make sure to leave some space at the edges for rolling. The more cheese, the better, right?
Step 4: Roll and Seal
Time to roll! Starting from the end with the cheese, roll the dough tightly. Tuck in the sides as you go to seal the cheese inside. This step is crucial; we don’t want any cheesy escapes during baking!
Step 5: Make the Garlic Butter
In a small bowl, mix together the melted butter, minced garlic, chopped parsley, grated Parmesan, and Italian seasoning. This garlic butter mixture is what will make your rollups shine with flavor. It’s like a warm hug for your rollups!
Step 6: Arrange on Baking Sheet
Place your rollups seam-side down on a lined baking sheet. This helps them stay sealed while baking. Make sure to give them a little space to breathe; they’ll puff up nicely!
Step 7: Brush with Garlic Butter
Using a pastry brush, generously coat each rollup with the garlic butter mixture. Don’t be shy! This is where the magic happens, and your kitchen will smell heavenly.
Step 8: Bake to Perfection
Pop the baking sheet into the preheated oven and bake for 12–15 minutes. Keep an eye on them; you want them to be golden brown and bubbly. The anticipation will be worth it!
Step 9: Serve and Enjoy
Once they’re out of the oven, brush them with a little extra garlic butter if you like. Serve your Cheesy Garlic Butter Rollups hot with marinara or ranch for dipping. Get ready for the compliments to roll in!
Ingredients for Savory Cabbage Rolls with Spiced Beef & Rice
Gathering the right ingredients is the first step to creating these mouthwatering Savory Cabbage Rolls with Spiced Beef & Rice. Here’s what you’ll need:
- Green cabbage: A large head provides the perfect leaves for wrapping. Look for fresh, firm cabbage for the best results.
- Ground beef: This is the star of the filling. You can also use ground turkey or chicken for a lighter option.
- Cooked rice: Medium or long grain works well. Leftover rice is a great time-saver!
- Onion: Finely diced, it adds sweetness and depth to the filling. You can substitute with shallots for a milder flavor.
- Garlic: Minced garlic brings a punch of flavor. Fresh is best, but you can use garlic powder in a pinch.
- Egg: This helps bind the filling together. If you’re vegan, a flax egg can be a great substitute.
- Fresh parsley: Chopped parsley adds a fresh, vibrant touch. Dried parsley can work too, but fresh is always better!
- Spices: Paprika, ground cumin, black pepper, and salt enhance the flavor profile. Feel free to adjust based on your taste preferences.
- Olive oil: Used for sautéing the onions and garlic, it adds richness. You can swap it for vegetable oil if needed.
- Canned crushed tomatoes: This forms the base of the sauce. Look for high-quality tomatoes for the best flavor.
- Tomato paste: It intensifies the tomato flavor in the sauce. You can use fresh tomatoes if you prefer, just cook them down longer.
- Sugar: A pinch balances the acidity of the tomatoes. You can use honey or maple syrup as alternatives.
- Dried oregano: This herb adds a lovely aroma. Italian seasoning can be a good substitute.
- Chili flakes: Optional, for those who like a bit of heat. Adjust according to your spice tolerance.
- Beef or vegetable broth: This adds depth to the sauce. Homemade broth is fantastic, but store-bought works just fine.
For exact measurements, check the bottom of the article where you can find everything listed for easy printing!
How to Make Savory Cabbage Rolls with Spiced Beef & Rice
Step 1: Prepare the Cabbage Leaves
Start by bringing a large pot of water to a rolling boil. Carefully core the cabbage and peel off 12 to 14 whole leaves. Blanch these leaves in the boiling water for about 2 to 3 minutes. This softens them, making them easier to roll without tearing. Once softened, drain the leaves and set them aside to cool. Trust me, this step is crucial for perfect Savory Cabbage Rolls with Spiced Beef & Rice!
Step 2: Make the Filling
In a large mixing bowl, combine the ground beef, cooked rice, finely diced onion, minced garlic, egg, chopped parsley, paprika, cumin, salt, and pepper. Mix everything gently until just combined. Be careful not to overmix, as this can make the filling tough. You want it to be tender and flavorful, just like the rolls themselves. This filling is the heart of your Savory Cabbage Rolls with Spiced Beef & Rice!
Step 3: Roll the Cabbage
Now it’s time to fill those cabbage leaves! Take a softened leaf and place 2 to 3 tablespoons of the filling in the center. Fold the sides over the filling, then roll it up tightly from the bottom to the top, creating a neat parcel. Repeat this process with all the leaves and filling. Each roll should be snug but not too tight, allowing the filling to expand while cooking. You’re on your way to delicious Savory Cabbage Rolls with Spiced Beef & Rice!
Step 4: Prepare the Sauce
In a deep skillet or Dutch oven, heat the olive oil over medium heat. Sauté the chopped onion and minced garlic until they turn golden and fragrant. Then, stir in the tomato paste, followed by the canned crushed tomatoes, sugar, oregano, and broth. Let this simmer for about 5 minutes, allowing the flavors to meld beautifully. This sauce is what makes your Savory Cabbage Rolls with Spiced Beef & Rice so comforting!
Step 5: Simmer the Rolls
Carefully nestle the cabbage rolls seam-side down into the simmering sauce. Cover the pot and let them cook on low heat for 45 to 50 minutes. This gentle simmer allows the flavors to infuse and the filling to cook through. The aroma will fill your kitchen, making it hard to resist! Your Savory Cabbage Rolls with Spiced Beef & Rice will be perfectly juicy and comforting!
Ingredients for Cheesy Yellow Squash Tots with Zesty Yogurt Dip
Gathering the right ingredients is the first step to creating these scrumptious Cheesy Yellow Squash Tots with Zesty Yogurt Dip. Here’s what you’ll need:
- Yellow Squash: The star of the show! Grated and squeezed to remove moisture, it gives the tots their veggie goodness.
- Onion: A small, finely grated onion adds a sweet and savory depth to the flavor profile.
- Cheddar Cheese: Shredded cheddar brings a rich, melty texture that makes these tots irresistible.
- Parmesan Cheese: Grated parmesan adds a nutty flavor and helps bind the mixture together.
- Breadcrumbs: Panko or regular breadcrumbs create that delightful crunch. They’re essential for achieving the perfect texture.
- Eggs: Two large eggs act as a binding agent, helping all the ingredients stick together.
- Fresh Herbs: Parsley or dill adds a burst of freshness. Feel free to mix it up based on your preference!
- Garlic Powder: A hint of garlic powder enhances the overall flavor without overpowering the dish.
- Paprika: This spice adds a subtle smokiness and a lovely color to the tots.
- Salt & Black Pepper: Essential seasonings to elevate the taste. Adjust to your liking!
- Olive Oil: Use for pan-frying or opt for baking spray if you choose to bake the tots.
- Greek Yogurt: The base for the zesty dip, Greek yogurt is creamy and tangy, making it a healthier choice.
- Lemon Juice & Zest: Fresh lemon juice and zest brighten the dip, adding a refreshing zing.
- Fresh Dill: Finely chopped dill complements the yogurt dip beautifully, enhancing its flavor.
- Garlic: A minced garlic clove (or garlic powder) adds a punch of flavor to the dip.
For exact measurements, check the bottom of the article where you can find everything listed for easy printing. Happy cooking!
How to Make Cheesy Yellow Squash Tots with Zesty Yogurt Dip
Now that you have all your ingredients ready, let’s dive into the fun part: making these Cheesy Yellow Squash Tots with Zesty Yogurt Dip! Follow these simple steps, and you’ll have a delicious snack in no time.
Step 1: Prepare the Squash and Onion
First things first, grab your grater and get to work! Grate the yellow squash and onion. Once you’ve done that, place them in a clean towel or cheesecloth. Squeeze out as much moisture as possible. This step is crucial for achieving crispy tots. Trust me, no one wants soggy bites!
Step 2: Mix the Ingredients
In a large mixing bowl, combine the grated squash, onion, cheddar cheese, parmesan cheese, breadcrumbs, eggs, fresh herbs, garlic powder, paprika, salt, and black pepper. Mix everything together until well incorporated. You want the mixture to hold together nicely, so give it a good stir!
Step 3: Shape the Tots
Now comes the fun part! With your hands, form small tot-shaped logs or rounds from the mixture. Don’t worry about making them perfect; a little rustic charm adds character! Place them on a tray lined with parchment paper. This will help prevent sticking.
Step 4: Cook the Tots
Time to cook! You can choose between pan-frying or baking. For pan-frying, heat some olive oil in a skillet over medium heat. Cook the tots until they’re golden brown on all sides, about 3-4 minutes per side. If you prefer baking, preheat your oven to 200°C (400°F). Line a baking sheet, spray it with oil, and bake the tots for 18-20 minutes, flipping halfway through. Either way, you’ll end up with crispy, cheesy goodness!
Step 5: Prepare the Zesty Yogurt Dip
While the tots are cooking, let’s whip up that zesty dip! In a small bowl, mix together the Greek yogurt, lemon juice, lemon zest, fresh dill, minced garlic, salt, and pepper. Stir until everything is well combined. Chill the dip in the fridge until you’re ready to serve. It’s the perfect refreshing complement to your cheesy tots!
Step 6: Serve and Enjoy
Once your Cheesy Yellow Squash Tots are golden and crispy, it’s time to plate them up! Arrange the tots on a serving platter with the zesty yogurt dip in the center. For a lovely presentation, garnish with extra dill or parsley. Now, gather your friends and family, and enjoy this delightful snack together!
Ingredients for Strawberry Pistachio Chocolate Cups
Let’s gather our ingredients for these delightful Strawberry Pistachio Chocolate Cups! Each component plays a vital role in creating that perfect balance of flavors and textures.
- Milk or Dark Chocolate: This is the star of the show! Choose your favorite type for a rich, creamy base.
- Fresh Strawberries: Sweet and juicy, they add a burst of freshness. Halve or slice them for a beautiful presentation.
- Kataifi Pastry: This optional ingredient brings a unique crunch. If you can’t find it, shredded phyllo or even crushed cookies work well too!
- Whipped Cream: Sweetened whipped cream adds a light, airy layer. You can make your own or use store-bought for convenience.
- Pistachios: Chopped pistachios provide a nutty crunch and a pop of color. They’re also a great source of healthy fats!
- Whole Strawberries: These are for garnish, giving your cups a stunning finish that’s sure to impress.
For exact measurements, check the bottom of the article where you can find everything listed for easy printing. Now, let’s get ready to create some magic in the kitchen!
How to Make Strawberry Pistachio Chocolate Cups
Now that we have our ingredients ready, let’s dive into the fun part—making these Strawberry Pistachio Chocolate Cups! Follow these simple steps, and you’ll be on your way to a delicious dessert that’s sure to impress.
Step 1: Melt the Chocolate
Start by melting your chocolate. You can use a double boiler for this, which is my preferred method. Just fill a pot with water, bring it to a simmer, and place a heatproof bowl on top. Add your chocolate and stir until it’s smooth and glossy. If you’re short on time, the microwave works too! Just heat it in 20-second intervals, stirring in between to avoid burning. Remember, patience is key here!
Step 2: Prepare the Cups
Once your chocolate is melted, it’s time to prepare the cups. Pour a spoonful of the melted chocolate into each cup. Use the back of a spoon to swirl it around, coating the bottom and sides evenly. This creates a lovely shell for your dessert. Let it set slightly at room temperature while you move on to the next step.
Step 3: Add Strawberries
Now for the fun part—adding the strawberries! Take your halved strawberries and gently press them against the inside walls of the chocolate cups. This not only looks beautiful but also adds a burst of flavor with every bite. Make sure to arrange them nicely for that layered look!
Step 4: Incorporate Crunch
To add some texture, sprinkle a small handful of shredded kataifi pastry into each cup. This gives a delightful crunch that contrasts beautifully with the smooth chocolate and creamy layers. If you can’t find kataifi, don’t worry! Shredded phyllo or even crushed cookies work just as well.
Step 5: Layer with Whipped Cream
Next, it’s time to add a layer of whipped cream. You can either pipe it in for a fancy touch or simply spoon it over the pastry layer. This light, airy layer adds a wonderful creaminess that balances the richness of the chocolate. Don’t be shy—make it a generous layer!
Step 6: Final Chocolate Layer
Now, pour more melted chocolate over the whipped cream to cover and bind all the layers together. This will create a beautiful, cohesive dessert. Make sure to smooth it out so it looks nice and even. You want every bite to be a perfect blend of flavors!
Step 7: Garnish and Chill
Finally, it’s time to garnish! Add some swirls of whipped cream on top, sprinkle with chopped pistachios for that nutty crunch, and place a whole fresh strawberry in the center for a stunning finish. Now, pop your cups in the refrigerator for about 20–30 minutes to let everything set. Trust me, the wait will be worth it!
Ingredients for Cool Whip & Pudding Frosting
Let’s gather our ingredients for this delightful Cool Whip & Pudding Frosting. Each component plays a vital role in creating that creamy, dreamy texture we all love. Here’s what you’ll need:
- Instant pudding mix: Choose your favorite flavor, like vanilla or white chocolate. This is the star of the show, giving the frosting its rich taste.
- Cold milk: This helps activate the pudding mix. Make sure it’s cold for the best results!
- Cool Whip: The magic ingredient! Thawed Cool Whip adds a light, fluffy texture that makes this frosting irresistible.
- Powdered sugar (optional): If you like your frosting a bit sweeter and more stable, this is a great addition. Just a half cup will do!
- Vanilla extract (optional): A splash of this enhances the flavor beautifully. You can also experiment with almond or coconut extract for a twist.
For exact quantities, check the bottom of the article where you can find everything listed for easy printing. Now, let’s get ready to whip up some frosting magic!
How to Make Cool Whip & Pudding Frosting
Now that we have our ingredients ready, let’s dive into the fun part—making this Cool Whip & Pudding Frosting! Follow these simple steps, and you’ll have a delicious frosting in no time.
Step 1: Whisk the Pudding Mix and Milk
Start by grabbing a large mixing bowl. Add the instant pudding mix and cold milk. Whisk them together until the mixture is smooth and slightly thickened. This should take about two minutes. You want it to be creamy, not lumpy. Trust me, this step is crucial for that perfect texture!
Step 2: Fold in the Cool Whip
Next, it’s time to fold in the Cool Whip. Gently add the thawed Cool Whip to your pudding mixture. Use a spatula to fold it in carefully. You want to keep that light, airy texture. Be patient; this is where the magic happens!
Step 3: Add Optional Ingredients
If you’re feeling adventurous, now’s the time to add any optional ingredients. Mix in the powdered sugar for extra sweetness and stability. A splash of vanilla extract will enhance the flavor beautifully. You can even swap it for almond or coconut extract for a fun twist. Just remember, a little goes a long way!
Step 4: Chill the Frosting
Once everything is combined, it’s time to chill. Cover the bowl with plastic wrap and pop it in the refrigerator for about 15 to 20 minutes. This helps the frosting firm up, making it easier to spread or pipe. Trust me, the wait is worth it!
Step 5: Use the Frosting
Finally, your Cool Whip & Pudding Frosting is ready to shine! Use it to frost cakes, cupcakes, or even as a dip for fresh fruit. The options are endless! Just grab a spatula or piping bag, and let your creativity flow. Enjoy every delicious bite!
Ingredients for Authentic German Onion Pie (Zwiebelkuchen)
Gathering the right ingredients is the first step to creating this delicious Authentic German Onion Pie. Here’s what you’ll need:
- All-purpose flour: This forms the base of your flaky crust, providing structure and texture.
- Salt: A pinch enhances the flavors of the crust and filling, making everything taste better.
- Unsalted butter: Cold and cubed, it creates a tender, flaky crust. You can also use lard for a richer flavor.
- Egg: This helps bind the crust together, giving it a lovely golden color when baked.
- Cold water: Just a splash helps bring the dough together without making it sticky.
- Onions: The star of the show! Sweet, thinly sliced onions caramelize beautifully, adding depth to the pie.
- Bacon: Optional but traditional, diced bacon adds a savory crunch that complements the onions perfectly.
- Sour cream or crème fraîche: This creamy element enriches the filling, giving it a luscious texture.
- Heavy cream: Adds richness to the custard, making each bite melt in your mouth.
- Large eggs: These help set the filling, ensuring it holds together when sliced.
- Flour: A bit more is added to the custard to help thicken it up.
- Black pepper: A dash of this spice adds warmth and a hint of heat to the filling.
- Ground caraway seeds: Traditional in German cooking, these seeds add a unique flavor. Feel free to skip if you’re not a fan.
- Fresh thyme leaves: A lovely garnish that adds a pop of color and a fresh herbal note.
For exact measurements, check the bottom of the article where you can find everything listed for easy printing. Happy cooking!
How to Make Authentic German Onion Pie (Zwiebelkuchen)
Now that you have all your ingredients ready, let’s dive into making this delicious Authentic German Onion Pie! Follow these simple steps, and you’ll have a pie that’s sure to impress.
Prepare the Crust
Start by mixing the all-purpose flour and salt in a large bowl. Then, cut in the cold, cubed butter using a pastry cutter or your fingers until the mixture resembles coarse crumbs. Next, add the egg and a few tablespoons of cold water, mixing until a dough forms. Wrap the dough in plastic wrap and chill it in the fridge for about 30 minutes. Once chilled, roll it out on a floured surface and press it into a greased tart or pie pan. Don’t forget to prick the base with a fork to prevent bubbling!
Cook the Onions
In a large skillet, melt the butter over medium-low heat. Add the thinly sliced onions and sauté them gently for about 20 to 25 minutes. You want them soft and golden, not burnt! If you’re using bacon, toss it in once the onions are nearly done, cooking until it’s lightly crisped. This combination creates a beautiful flavor base for your pie. Once cooked, let the mixture cool slightly before adding it to the custard.
Make the Custard
In a mixing bowl, whisk together the sour cream, heavy cream, and eggs until smooth. Then, add the flour, salt, black pepper, and ground caraway seeds, if using. Mix until everything is well combined. Now, gently fold in the cooled onion and bacon mixture, ensuring it’s evenly distributed. This custard will be the heart of your Authentic German Onion Pie, bringing all those flavors together in a creamy embrace!
Bake
Preheat your oven to 375°F (190°C). Pour the onion-bacon custard filling into the prepared crust, spreading it evenly. Bake the pie for 40 to 45 minutes, or until the top is golden and the center is set. The aroma wafting through your kitchen will be irresistible! Once baked, let it cool for a few minutes before slicing. Garnish with fresh thyme leaves for that extra touch of flavor and presentation.